- Armament and ammunition +++
- Weapons and ammunition: nuclear mini charge
- Weapons and ammunition: Nuclear Mini Charge (fat man)
- Weapons and ammunition: Box (3)
- Power armor: nuclear block (2)
- Covers +.
- DANGER: Tin jars!
- DANGER: Gas leak!
- Danger: Explosive barrels!
- DANGER: Oil!
- Danger: Radiation (moderate)!
- Fraction: Brotherhood Steel
- Fraction: Wild Guli
- Fraction: Character: Enhee Clark (Initiate Clarke)
- Fraction: Character: Knight-Sergeant Gaille (Knight-Sergeant Gavil)
- Fraction: Character: Knight Lucia (Knight Lucia)
- Fraction: Character: Knight Rylan (KNIGHT Rylan)
- Medicines or chemical. Preparations
- Quest Visit: Liberty Reprimed (Brotherhood Steel)
- Quest Visit: Spoils of War (Brotherhood Steel)
- Quest Visit: AD Victoriam (Brotherhood Steel)
- Quest Visit: Duty or Dishonor (debt and dishonor) (steel fraternity)
- Quest Visit: Learning Curve (Brotherhood Steel)
- Services: Workshop
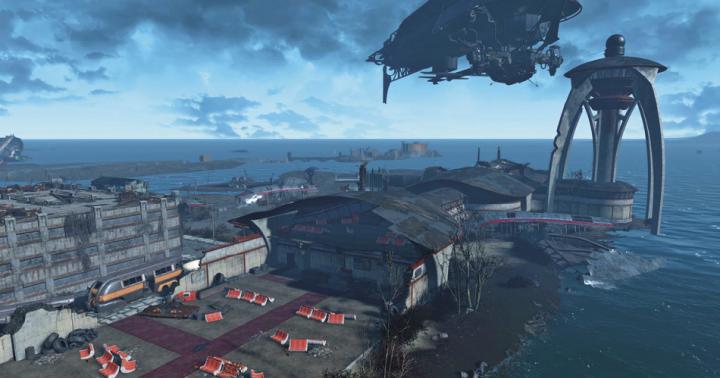
Map - Boston Airport (exterior)

Before the war, Boston International Airport was the largest transport hub on the east coast. In addition to its characteristic flying tower, the airport territory also included a large terminal, hangars, runways and numerous technical buildings.
The airport has greatly suffered from the war. Most of its main buildings, including major parts of the terminal, have long collapsed, and raising the sea level led to the flooding of runways and household buildings. Only dispatching and several hangars remain relatively intact. After the mooring, fell at the airport in the act II, the fraternity began to take this area and turns it into its base.
Below is assumed that the Brotherhood has become already at the airport. If you plan to explore the location before the act II, then you will meet the wild ground. There will also be available fewer terminals and objects.
Terminal Arrival

Here you can equip the settlement in relative security, if you, of course, are in the Union with the Brotherhood of Steel.
Parking Terminal Departure

Parking offers a great view (and for sniper too) to the airport.
Stock

Rusting warehouse next to the bay. Here you can find stocks of medicines and ammunition.
Chip plane

Thought up long before your appearance, this fuselage of the aircraft, if necessary, can serve as a defensive strengthening.
Main hall

In this place, the fraternity began to restore their giant combat robot.
Departure terminal

Here is the landing platform for the crimsons of the brotherhood.
Flying Management Tower

From the dispatch, an impressive view of the defensive structures of the brotherhood of steel opens.
Ruins of the Boston Airport (Login)

You can access this door leading to the abandoned airport tunnel system at any time. However, the Brotherhood Quest has become "Duty and Dishonor" (Duty or Dishonor) must be active for access to all places of this location.
Map - Boston Airport (Interior)

Most of the ruins of the airport can be studied only during the fulfillment of the brotherhood quest "Duty and Dishonor" (Duty or Dishonor). To unlock the airport elevator and several doors, you will need an Airport Ruins Card Card card, which can be found at the Clark Punch.
The current quest will be affordable after passing two quests of the brotherhood of steel: "without mercy" and the "missing patrol".
Captain Kels ordered you to investigate the stealing of the airports from the airport. You can get all the details from Knight-Sergeant Gervil.
You will find it in the Boston Airport Building. He is convinced that this is some kind of error of the campus Tigan, as in a warehouse a strict guard and no one could do anything. But after all, the order is an order, he proposes to interrogate the newcomers of the Knight of Lucia and the Clark's novice. You can do it in any order.
Interrogate Clark Supply
Your first suspect is Clark's novice. You will find it immediately at the airport warehouse. Ask him about what he knows and saw.

Charisma
You can ask him about Lucia if you want (the level of belief is light).
Interrogate Knight Lucia
The second is your suspect - Knight Lucia. It is also located in the airport warehouse. Ask a few questions about the recent incident. She also really knows anything.

Charisma
You can ask her about Clark if you wish (the level of belief is medium). In the case of a successful belief, it will share with its suspicions, then most of the tasks can be skipped (go to the point " Talk to the novice of Clark "this passage).
Talk to the Knights-Sergeant Gavil
Interrogation did not bring promotion in the investigation. Knight-Sergeant Gaper demands real evidence, as it does not believe that someone from his team went to that. Thanks to the direct order from Kels, to investigate these things, you can search at least every bed at the "Prim.", And no one will tell you words. Perhaps it is worth starting with the property of Lucia and Clark.
Find evidence
Go to "Priedmen" and look for the bed of Lucia and Clark. They are indoors above the dining room on the main deck.

Their chests are locked, so you can:
- Steal the keys from the chests directly from the owners, returning to the supply base in the Boston Airport.
- Clark Superior Check Check (Light Lead Level) and Lucier Knight Chest (Castle level - medium).
- Or find the Clark key on his bed, open its chest, in which you will find the key from the luracy chest.
In the chest Clark, you will find a note from Lucia, from which you learn that Clark for some reason rushed into her things, and in the chest of Lucia - her personal diary.
Read the Lucia Knight Diary
After reading the diary, you will understand that these two do not negotiate something. It turns out the novice Clark recently behaves strangely: he closed in himself, disappears somewhere and does not go to duty. It is worth clarifying.
Talk to the knight
Ask her a question for direct why she covers Clark, and she will immediately share with you information. Clark often disappears somewhere, she proposes to trace him. And what, good idea!
Follow the novice of Clark
Lay your main suspect and follow him at a safe distance. Go away, if you suddenly be seen. Ultimately, the Suspected Clark will hide in the ruins of the Boston Airport.
Find Clark Punch
When you enter the same, where the crharque obedient entered, he will already have time to hide. We'll have to find it.
You fell into a little-known destroyed part of the airport, including the metro station and the luggage issue point. This place is filled with wild guys and water infected with radiation, and your suspect disappeared on the elevator. You will not be able to use it if you do not have airport skipping.
We go to search for the Clark Person. Go to the door to the right of the elevator, kill the first Guli and look into the corridor located on the left wall. There you will find the killed Knight Rylaan, take it from the nolorates. Thanks to this discovery, you will have more options in a conversation with the novice Clark, when you find it.
Continue to go along the airport corridor when you get up in a dead end, look around - there are homemade lifting in the ceiling. We were in the airport parking. Follow the only path through the parking lot, killing along the path of all creatures. Beware of luminous Gulia, as they can make emissions of radiation energy, which revives all that you have just killed, Guli. Please accept the gland to even slightly protect yourself from radiation, which will poison the glowing gul.
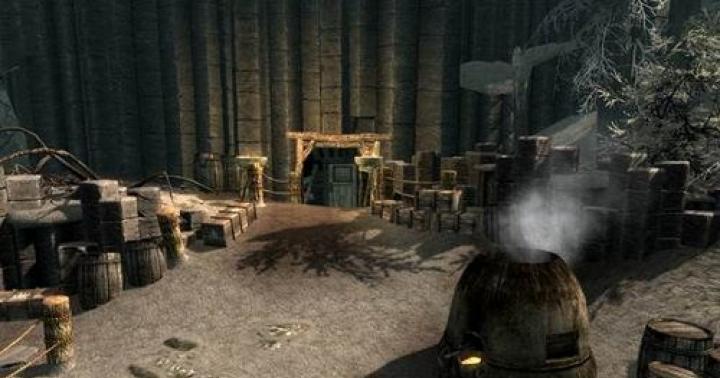
Parking will lead you to the metro station "Airport", where the next party of the Guli is waiting for you, but you can schit. Log in to the station in a secret movement mode and crack the security service terminal to the left of you (level - light) until the guli noticed you, and activate the turret. Then immediately run into the adjacent door, in the passage, which is visible in the screenshot. Thus, half the Guli will overcome the turret, and you will achieve the rest, but try and yourself do not get under the shelling. In the surplus you will find some ammunition and weapons on the rack.

Then go along the rail and look at the train in which you will find a bag with ammunition and weapons. Through the train you will get another room with the security service terminal and the door at the end of the room. Hack the terminal (level - light) and activate these turret. Behind the door, the turret is already destroying your enemies, a little waiting, open the door and recycle the remaining hum. But before leaving this room, turn off the turret using the same terminal, and collect medicines from the shelving.

From the metro station you will get into the luggage output compartment, after you leave all the hums, check the suitcases - who knows that there are no people. You can also look into the information center terminal - your card will be updated by a pair of new locations, which can be explored, and you will receive a quest from the "Miscellaneous" section "Find the Treasures" Jamajka Plein "." It sounds interesting!
Go down the stairs and go along the corridor along the tape with the luggage until you find the suspect.
Talk to the novice Clark
If you decide to chat with the novice of Clark, then you will find out that he had a pity for the guys because of personal reasons, and he secretly fed the local gulles so that they were not destroyed, and they did not attack them when they were hungry. That is why only edible supplies disappeared.

You have a wide choice, how to do. You can:
- To kill him immediately, even without entering him into the conversation.
- Write it in any way, referring to him at the same time.
Charisma
Optionally, you can convince Clark's novice in that the Guli needs to be destroyed (the level of belief is different).
Charisma
Just convince the culprit to surrender independently (the level of belief is medium).
- Convince Clark's novice to go out. He will leave the airport, although you can accidentally meet later.
- Compass him that modernize about your discovery.
Extermination of Guli (optional)
In my own desire, you can destroy all the gulles that live at the airport (or they will be destroyed after graduating from the quest). It will be especially difficult to deal with the last game, when you already find the Clark's novice, as among ordinary Guli will be a rotten glowing gul, namely, it is necessary to kill it, so that this optional point for the extermination of the Guli is considered to be performed.

You can hack the supply department terminal (the level is complex), which you see in the screenshot above (next to Clark), and activate protectors. They will help you in the fight against the guils, which so diligently fed the thief of the supplies. Also, they can also be activated from the terminal located below, where the novice Clark kept Guli under the lock. By the way, to open the door to the lower level, use the airport worker certificate. It can be taken on the table next to the terminal, get from the obey or pick it up after the assassination of the novice. At the lower level, you will also find a nuclear power unit for power armor and in one of the adjacent rooms with a locked door (the level of the lock is light) - the safe (the level of the castle is medium) with ammunition.
Check Captain Kelsu
Take advantage of the elevator to get out of the ruins of the airport, fortunately, now you have an employee employee certificate. Go to "Pridmen" and report to Captain Kels on the results of the investigation. You have several action options, depending on what happened at the airport. But in principle, you can:
- Sold about theft. If the novice Clark is alive, he will continue to work at the airport.
- Or tell the truth. If the novice Clark is alive, he will be delated in the Cambridge police station. During the passage of the feed of the subway "The abyss of war", you can free it as soon as possible if the subway is in the future.
Charisma
You can also cast Captain Kese that this guli has grown supplies from the airport (the level of belief is complex).
In any case, you deserve i like the award 10
In addition to small settlements on the expanses of Fallout 4 there are large settlements that at first will have to be cleaned, and then start equipping. One of the like is the Boston Airport.
Boston Airport in Fallout 4
While you walk through the expanses of empty, you will probably notice that the closer to the center of the map you are approaching, these settlements are becoming more. And it is not surprising, since the local has a huge number of different resources and access to research. One of these locations is the Boston Airport in Fallout 4. This is a fairly large location that takes practically a whole peninsula. It carries the mass of various fractions, including the fraternity of steel. It is worth noting that it is from here that they make flying in their transport. Boston Airport in Fallout 4 is a settlement consisting of several places, ranging from a simple warehouse and workshop, ending with an impressive departure terminal and a high flight management tower. On the expanses of the location you will find a lot of various adventures, new characters and other interesting elements.
Where to find this place?
In fact, find the ruins of the Boston airport in Fallout 4 will be easy, as almost every vacuuable resident of the emptiness knows about them, in addition, you will be given different tasks there. But if you wanted to go to this location personally, at first it is worth considering that this requires 35 levels. After that you can go to the center of the map, then turn towards the East and go to a huge peninsula, this is the very airport.
Many ask about where in the Boston airport in Fallout 4 workshop? In fact, it is immediately at the entrance to this location, the main thing is not to miss it and react to the fact that this construction is your goal. Just be careful.
What awaits us there?
As is customary, for large location there are long adventures. Therefore, you have to fight various enemies here, perform chains of quests from the brotherhood of steel and knights. The region has a lot of secret places and secrets, which is already talking about the abundance of things that can be found there, including resources and weapons. Food of the Boston Airport in Fallout 4 will not disappoint you, the main thing is to pay attention to it and to collect everything you need on time. There is even a few gardens, where you can grow products for consumption. In fact, this location is subjected to cleaning and after successful execution, you can develop a small settlement here. And this is not just good, but an excellent achievement that will support you in further adventures.
In the total amount in Fallout 4 there are 29 settlements. Each of them can be populated and equipped. Part of the settlements is given immediately without any special requirements, and to obtain some it is necessary to perform a certain task from local residents, or to clean the territory from raiders and other opponents.
Settlement and their pros and cons:
Detailed Consider each settlement, I will identify positive and negative points. Learn more about how to build, develop and protect the settlement.

Sankchuari.

- No requirements for receipt.
It is the first settlement that will be available in the game. Native city of the main character. There are already ready-made buildings, in the district you can find a sufficient amount of scrap and other material, as well as a river.
Parking Trucks "Red Rocket"

- No requirements for receipt.
There is a settlement in south of Sankchuari. Here you will meet a dog. In the district, a slight amount of scrap, but the settlement is equipped with workbenches.
Farm Eberneti

- To get the settlement, you must perform the task "Debt Return".
This place is rich in the earth, so you can grow a crop in large quantities. Excellent location for farms and generally creating food. To protect sufficient turons, because raiders in these parts are not so much, and they are infrequently visiting.
Tenpains-Bluff

- To get a settlement, you need to task on site.
There is already a farm here. Having settled this place, a part of the minitmen recovery will occur.
Restaurant "Starlat"

The positive points include the presence of infrastructure facilities, but at the same time in the settlement there is not enough space for widespread construction.
Commune "Solar ties"

- To get a settlement, it is necessary to clean the area.
There are beds, at home, and even Handy's robot will be able to settle in his own house.
FORPOST "ZAMONDA"

- To get a settlement, it is necessary to clean the area.
Here you will find one of the magazines that will give Perk for your character. The settlement itself is characterized by a small area with power facilities. From the windows of the houses there is a picturesque view of the lake. And do not care that it is toxicJ.
Grylitsa Grintop

It is a great place to create meals, since there are already ready-made farms.
Cooker

- To get this settlement, it is necessary to complete the task on site.
Quite a lot of farms. It is a settlement of Gul, so restoring the settlement, you will strengthen the relationship with Hancock.
Farm Finch

- To get this settlement, you must perform the task "from the fire".
Boat house tafington

- To get this settlement, you must clean the area.
These edges are characterized by huge water reserves.
Alliance

- To obtain this settlement, it is necessary to determine the fate of the current residents or to fulfill the task "human errors".
If desired, control these lands, you will come across a moral dilemma. Leaving the invaders, you can access the "fat" merchants.
Gragaden

- To get this settlement, you will have to perform the task "Muddy Waters".
This area is populated by robots that work on their own farm. Such a settlement is convenient to develop, since the robots do not need water and food. However, protection will have to pay due attention.
Station "Oberland"

- To become the owner of this settlement, it is necessary to help local residents in every way.
These edges are very attractive because there are already farms and houses.
Cottage on the bank

Lighthouse Kingsport

There are a large number of infrastructure objects, as well as access to water.
Mansion of the cereals family

- The settlement is given after stripping the terrain.
In this edge you will find a large three-story manor and the land adjacent to it. Since the lands are empty, you will have to erect everything yourself from scratch.
Nodrhagen Beach

- To get this settlement, it is necessary to complete the task on site.
Despite the considerable amount of dirt, there is a large amount of water.
Boston Airport

- You can get this settlement by the task of the "Shadow of Steel".
The most important minus is the lack of opportunity to build farms and objects. But these places are rich in scrap. Therefore, deciding to settle the settlement to the finished houses you need to think about the delivery of food.
Somerville Place

- You will receive this settlement by performing a task at the spot.
The area is characterized by a large number of farms.
Pier "Egret Tours"

- To get this settlement will have to either make friends with Philis Dail, or kill it.
There are many buildings, a lot of water, but at the same time traps.
Jameake Plein

- To get this settlement, it is necessary to clean the area.
Happy settlers already live here, there are many buildings, and even parking.
SPECTKL-AYLEND.

- You will get this settlement after stripping the terrain.
Very promising area. To poison here is only closer to the end of the game, since strong opponents of high levels inhabit. In the settlement, extensive territories for construction, many energy facilities and water.
Farm Warwikov

- To get a settlement, you need to task on site.
There are a large number of farms and plants.